How to Install Vehicle Mods in Gta San Andreas
You all know that mods from our site are installed automatically. To add a mod to the site, it is no longer enough just to upload an archive with instructions. Nevertheless, we tried to simplify the addition as much as possible. Now I will tell you what needs to be done for this.
Video instruction for adding modifications to the site from DEMON91052
Two additional items now appear in your user menu (top right): Add Mod and My Mods. On the page "My mods" There is a list of all the modifications you added earlier. Since you most likely have not added any mods yet, I will talk about this item later. Now go to the Add Mod page.
Here is the following picture:
On this page you are generating data for the future mod installer. First you need to fill in basic information such as "Name", "Short description", "Author's nickname" "author's e-mail", "Author's site", "Converter", Brand "Model". You usually see all this data when you run the mod installer. Only required is a field "Name", but try to fill in all the fields. Do not forget to indicate the authors, because it is thanks to their work that we have these modes. If you are adding a machine mod, be sure to specify it Brand and Model, so that the mod falls into the desired category of our File Directory.
Next, you need to select the version of the game (Vice City, San Andreas, GTA 4) for which this mod is intended. After selecting the version, you can add the rest of the data.
(As an example, I will add a car mod to GTA San Andreas - Pagani Huayra ver. 1.1. Take a close look at how I filled in the fields).

Choose Category in which the mod will be placed (in my example, this category is GTA San Andreas Cars).
And also choose Replaceable model to replace which this mod was made by the author (in my example, the author by default made this replacement model - Buffalo). When choosing a replacement model, the default settings for the car from the game are automatically substituted in the Settings tab. Next I will show how we will change these settings. And we indicate whether the added mod uses the CLEO library. (In my example, having an installed CLEO library is not required)
Below you have 4 tabs: In IMG, In folder, Settings and Lines. Each tab has a tooltip that describes what it serves for. To get a hint, simply hover over the question mark of the tab you are interested in.
In the first tab - In IMG - you must provide the installer with files that should be placed in any * .img archive. If this is not required, then on this tab you can not fill anything up. In order to upload files, click on the button "Download files" (it may appear with a slight delay) and select the desired files. You can have several at once. After selecting files on your computer, click "Open".
(Since I am adding a machine mod, I need to upload the files of the added model to this tab: buffalo.dff and buffalo.txd)

The files you select will immediately begin to be uploaded to the server. If you change your mind, you can stop the download by clicking on the "Cancel all downloads" button or you can remove any separate file from the queue by clicking on the cross next to it. For each file, you must specify the path to the * .img archive. The path is relative to the folder with the game without a slash at the beginning. When downloading all files, the * .img default archive ( models \\ gta3.img for GTA SA, VC or pc \\ models \\ cdimages \\ vehicles.img for GTA IV). The default path can be changed by clicking on the pencil icon next to it.


Each already downloaded file can be edited or deleted. Therefore, at any time you can change the path to the * .img archive or the name of the file to be added.

For the mod, which I add as an example, the author has provided paint work. Accordingly, I also upload these paintwork to the masonry. In the IMG (these are four textures with paintwork: buffalo1.txd, buffalo2.txd, buffalo3.txd, buffalo4.txd). This is how my tab now looks In IMG:

To folder.
If during the installation of the mod you need to add or replace some files in the folder with the game, then this can be done on the second tab - To folder. Everything is the same as when adding to * .img, only the path must be specified not to the file, but to the folder to which we are copying. If you need to copy directly to the game folder (the root folder of the game, where the gta_sa.exe file is located), then leave the path blank. If you need to put the file in a subfolder, then specify the path to it (for example data, or CLEO or common \\ data).
(I add the usual mod of the machine without the support of the CLEO library or any other functions, so I skip this tab, because I have nothing to add to it)

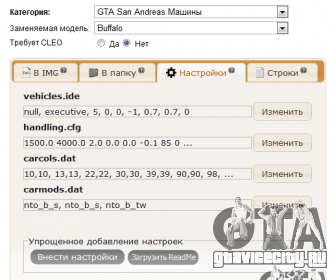
Settings
On the third tab, you need to make various settings for the transport:
- wheel size and frequency of appearance of cars - vehicles.ide;
- characteristics, control settings and behavior of the car - handling.cfg;
- color of transport - carcols.dat;
- the presence of tuning - carmods.dat (only for GTA SA).
When choosing Replaceable model On this tab, the fields are automatically filled with the standard settings from the game. The standard settings are suitable for mods only in isolated cases, so do not forget to make the author's settings for the added mod. Next I will tell you how to do it.
We make the settings.
For your convenience, we have come up with a simplified addition. If you have a regular mod, for example, a new model of a machine, you can quickly make settings by downloading the file attached to the ReadMe mod. To do this, click on the button "Download ReadMe" in block Simplified Upload and select this readme file. After it is loaded, the system will try to recognize the settings and add them to the table.
Also for your convenience, we came up with another option for simplified adding settings. Click on the "Make Settings" button and you will see the fields for making settings (I add Pagani Huayra ver. 1.1, which replaces the Buffalo in the game. To make new control settings, I fill this tab):

Just copy the lines you need to replace in these standard files here, click on the button "OK" and they will automatically be added to the table.
And here are the new settings that I have made:

Strings.
Adding the settings described in the previous tab is suitable only when adding the usual transport mode, i.e. new car, motorcycle, helicopter, etc. Of course, there are most of such mods, but sometimes it is necessary to replace or add lines in files for more complex mods. For this, the last fourth tab serves - Strings. Here is the manual addition. Click on the button Add and you will see the add form where you need to fill in the lines (path to the file, search type, phrase, new line), but more on that next time (I add the usual machine mode without any changes to other game files, so I skip this tab, because I have nothing to add to it).

After all the necessary parameters have been entered, you must enter the code from the image and you can press the button "Add mod." If everything is correct, then an inscription on the successful addition of the mod will appear on the screen:

Next, let's move on to the list of your modifications. This is the item My mods in the user menu.
On this page you can view a list of your modifications, download, edit, add screenshots and videos, as well as delete any of your mods. You can edit and delete the modification until you send it to the publication (green arrow).

So, after the generation of the mod, we need to download it and before publishing check its performance, as well as take screenshots of it in the game (We do not publish mods without screenshots on the site!).
(Recently, we are often asked questions about how to take a screenshot from the game, so lay out detailed instructions: How to take a screenshot from the game).
1. Click on the icon "Download" - marked with a red circle in the screenshot above - a new standard window will open for downloading files from our server.
2. Download the mod you just generated.
3. Install it in the game.
4. Find the installed mod in the game and check its performance. In my case, this mod is a car, to quickly find it in the game I use a trainer: GTA San Andreas Crazy Trainer.
5. Take screenshots (at least 3 pieces from different angles, preferably 5 or more). As I mentioned above, it is very convenient to take screenshots in the game using Fraps.
6. We exit the game and go to the My Mods section on the site to add the screenshots just taken and send the file for publication.
Adding screenshots to the generated mod.
To go to the section Screenshot management - click on the icon of the camera - marked with a red circle in the screenshot below:

Page opens "Screenshot management." In order to upload screenshots click on the button "Download files" (it may appear with a slight delay) and select the desired screenshots. You can have several at once. After selecting, press the button "Open" and they will start loading onto the server:

If you uploaded an extra screenshot or simply didn't like the uploaded screenshot, you can always delete it by hovering over it and clicking on the "cross" - the screenshot will be deleted immediately. You can also sort the screenshots in the order you need - just drag the screenshot. A screenshot that will be in the first place will go to the main page of the site.
Mods allow you to transform almost any game. So quite old projects get new graphics, or characters from a completely different one are added to one game world. Sometimes these files are used to work with the gameplay. It can be completely redone or partially improved. Many are interested in how to install a mod for GTA San Andreas.
In general, the installation of mods refers to the actions that are better to provide to relatively experienced PC users. This process involves replacing existing game files with new ones., and sometimes making changes to the old ones. In this regard, if a person does not understand the computer at all, it is better for him to provide such work to someone who is unlikely to ruin everything.
Folders and existing mods
For starters, it's worth considering which folders and files the original game has. For some of them, many modifications already exist, while others are almost never affected. For example, this can be said about the anim folder, which stores animation of characters and various processes.
- Audio, as the name implies, contains a sound component. It is often used when installing mods aimed, for example, for voice acting of characters, or, as an option, for the sounds of the forest and animals.
- Data is most in demand. Most players seek to diversify their weapons, improve transport or some characteristics - all this will be connected with this place. It is also here that the data responsible for the plot is stored.
- Movies contains game videos, titles and logos. Usually nobody touches them.
- Text stores subtitles. A variety of crackers are also added here.
Only a number of files remain, such as ReadMe, stream.ini, Install, vorbis.dll and some others. All of them are in no way associated with the installation of mods, and therefore are not required for such a process. The only point is that stream.ini is used by some programmers to work with optimization.

How to install a mod for GTA San Andreas?
Thanks to the mods, you can greatly diversify the game, literally give it a second life. In most cases, for each downloaded extension, its author applies detailed installation instructions. It's enough just to follow it, and everything will turn out.
Most often, to work with modifications you have to download and include a specialized utility called Crazy IMG Editor. In general, the preparatory process is as follows:
- You need to install the original version of the game.
- You need to get into the root folder and find there a section called "models".
- Inside it is a file gta3. img. It needs to be copied to the desktop or to some other folder. If it happens that installing the mods leads to some serious problems, it will be enough to drop this file back into the game folder and confirm the replacement.
- You must download the above program. Most often it is completely in English, but by going through the File-Language path, you can change the language to Russian by checking the box.
Now you can start working directly with mods. To start, you need to run the program and use the Open button to find the gta3.img file (not the one that was copied, but located in the data of the original game).


How to install a mod for GTA San Andreas:
- After successfully uploading the file to the Crazy IMG Editor, you need to click on Edit and select Add with replacement from the available ones.

- A window will appear in which you will need to find the previously downloaded mod. It is highlighted and click on Open.

- If everything is done correctly, then the phrase Files added will appear at the very bottom of the program window.

- Now you need to click on File and select the Rebuild archive item there.

- Another window will appear in which you need to find the models folder. It was from it that gta3.img was previously copied, so there should not be any problems.
- It is necessary to save the changes and confirm the replacement of files.

The fact that the process is in progress will be indicated by the green bar below. When it is full, the phrase Archive is open will appear on the left side. This indicates the completion of the installation. You can turn on the game and check if everything turned out right.

Other installation programs
In order to install modifications on cars and parkour, you can turn to other programs. For example, there is GTA Img Pro. Work will again be carried out through the gta3.img file.
- You need to run the program and set the path to this file in the settings.

- The previously downloaded mod is unpacked into the prepared folder.
- Through the Add section, unzipped data, in txd and dff formats, are loaded into Img Pro.

By pressing the Replace button, the resulting modification is loaded into the GTA. This completes the process. Another option is the GTA Garage Mod Manager program. It is used not only for working with extensions, but also for view a variety of 3 D models. With its help, you can study the characteristics of gaming technology. Sometimes mods loaded in this way do not display correctly in windowed mode, but otherwise they look normal.
How to install a mod on GTA San Andreas cars:
- First you need to download the necessary modifications and unpack them.
- After that, the program starts.
- In it you need to find the Installer button.
- After pressing, the Manual Car Installer item is selected.
- In the window that appears, the path to the necessary files is indicated.
- To add new characteristics of the machine, you need to copy them from the ReadMe file and place them in the appropriate place in the program.
It remains only to click on Install to download the modification to the game.
Movement in the game world of GTA San Andreas is limited to walking, running, short jumps and riding on vehicles. To add to this variety, you can try to use the modification. How to install a mod for GTA San Andreas parkour? Usually it's enough to simply unzip the downloaded file into the game folder.

Working with skins and possible problems
Some modifications do not replace the existing game model, but rather colorize it by adding a skin. Most often, the IMG Tool program is used to install such mods. With its help, gta3.img opens. From the list that appears, remove the txd file and replace it with the machine mode.
- Skins for outfits and the appearance of the characters are downloaded using approximately the same method.
- In this case, the player.img file opens through IMG Tools.
- From here they remove txd and insert their own skins instead. Typically, clothes so loaded are either in the protagonist's closet or in stores.
- To add skins to weapons, the exact same method is used as when working with machines.
When installing absolutely any mod, you need to remember that a lot depends on who made it and how. Such files are not an official element of the game and are often developed by amateurs, so no one is safe from a variety of bugs and errors. Sometimes problems arise due to an incorrect installation process.
It is worth disassembling another point. Having loaded the mod into the game on the car, it is easy to encounter a situation when in its search you have to run around the whole city. To not have to do this, you should turn to the help of the Garage Editor.
- You need to enable GTA San Andreas.
- Press Alt + Tab.
- Turn on the program.
- Choose a garage in it, located as close to the character as possible.
- Add the desired car there.
It remains only to expand the window with the game and again hold Alt + Tab. If everything is done correctly, then a loaded machine will appear nearby.
Video instruction
Mods for GTA: San Andreas are installed in three ways, which depend on the type of modification, the type of distribution.
Let's figure out how to install mods together!
There are computer games that you want to play and play, but the monotonous gameplay quickly bothers. Once again, modifications or mods for virtual entertainment will help. On some games they are installed in a couple of clicks, and to install the add-on on others you have to take a tambourine. Consider like on GTA: San Andreas in three ways.
Varieties
Modification or mod is an add-on for the game, created mainly by third-party developers (fans of the game, small studios). There are several types of modifications that make these or those changes:
- global - Almost the entire virtual world is undergoing changes: models, textures, balance, scripts, game objects, maps, objects, characters;
- mutator - transforms the virtual world in part, expands it, the impact on the game depends on the order of their loading (application);
- expansion of the world - Substitution of the concept of the gameplay, the emergence of new properties in objects and characters;
- official - similar to mutators, but created by video game developers;
- replayers - replace textures and models with improved, higher resolution, can significantly change the appearance of entertainment.
As for the boot order of the mutator, an explanation is needed here.
The next mutator in the list may invalidate the effect of the previous one. If one increases the damage done by melee weapons, and the second adds daggers, then their damage will remain the same.
Preparatory stage
Add-ons for GTA: San Andreas are installed in several ways: through special programs, by using the tools built into the installer and by unpacking the archive with a modification to the catalog with the toy.
In preparation, you will need to do the following steps:
- download the archive with the modification and unzip it;
- download the program through which the mod will be integrated into the game;
- download the installer with the modified files for the automatic installation of the add-on.
In the second case You will need several tools, depending on and its type:
- Crazy IMG Edition (advanced IMG Tool) - supports adding multiple extensions with one click, supports searching, rebuilds archives;

Crazy IMG Editor
- TXD Workshop - A tool for replacing files with textures, including compressed ones, is also needed to change sights.

Where to get mods?
You can from absolutely any resource!
However, you need to download them in the archive, and not through questionable downloaders that will leave behind more than one malicious program, spam, links to some resources, shortcuts, etc. Download archives only from trusted resources, after receiving the file it is strongly recommended to check it. An even better solution would be to send the archive or link to it on virustotal or another similar service.
Go around files that require a password to unzip: Anti-Virus cannot scan a password-protected code, and therefore the malicious code contained in it can easily get to your computer. It only needs to be run.
Perhaps the most optimal solution will be from torrent trackers, where they are tested by moderators and / or community users, if you can't download GTA with an integrated set of necessary extensions.

Installation methods
Consider all three methods to put the mod on GTA: San Andreas.
Installer
On popular sites, add-ons for entertainment are distributed in the form of self-extracting archives with scripts that, after unzipping, automatically recompile game files. When using this method, the user must specify the directory in which the resources of San Andreas are located, if the program does not determine it independently.
Crazy IMG Editor
The second method is to use the capabilities of the IMGTool application or its advanced counterpart Crazy IMG Editor (we will work with the second).
The first step is to backup the file. gta 3. img in the catalog models . If an error occurs during the installation of the add-on or it turns out to be non-functional, it is better to have a copy of the resource file. Replacing it is easier than reinstalling the game.
- To change the language, open the "File" main menu item and select "Language".
- Unpack the archive with the game resources.
- In Crazy IMG Editor, open gta3.img, located in the directory with the game.
- We call the menu item "Edit" and select "Add with replacement".

- In the "Browse" window, select mod files with extensions dff and txd and open them.
- After the status "Files Added" appears, open the first item of the main menu and call the command Rebuild Archive.
- In the next dialog, specify the path to store resources (this is the directory "Models").
- We replace the original gtaimg and wait for the operation to complete - the green bar at the bottom of the window displays the current progress of compressing the file.
- After changing the status to "Archive is open", the modification is installed, the game is ready to launch.
Replayers
This method can also help you install the mod.
Mods that change graphic elements are mostly textures. For GTA: San Andreas, they are skins and sights (we will deal with the process by the example of replacing an aim mark).
- Downloading a picture with transparency support (png format) to the computer.
- Launch TXD Workshop and click on the "Open TDX" button on the toolbar at the top of the window.
- Paving the directory path "Models" and select the file with the textures of the application - hud.tdx.
- All graphic elements found in the game will appear in the editor window. Select a picture with a name "SiteM16"And click on" Import ".

- Select a picture in png format and make changes using the "Save TDX" button.
To replace a font, you must name it font.tdx and copy with the replacement of the same file in the folder "Models".
Beginner's Guide to Mods
This article reveals the properties of the main types of mods used in GTA: San-Andreas, gives instructions and tips for installing them. § 1. Theory
The structure of the root folder (root directory) of the game
The folder with the original game contains 7 folders, 6 files and 2 launched applications (also, depending on the manufacturer of the disk from which you installed the game, the folder may contain files or programs that have nothing to do with the game, e.g. unzipping and etc.). To begin, consider the purpose of these folders and files.
Folder anim (animations) - here contains files with parameters of animations of peds and various processes. Mods associated with this folder, I have not met in my practice.
Folder audio (sounds) - all game sounds are in this folder. You will deal with it when installing mods related to adding or replacing sounds, e.g. fashion animals in the forest, the sound of the handbrake or story mods with voice acting.
Folder data (data) - the most interesting folder, it contains files with the parameters of weapons, vehicles, characteristics of peds, water level, map of the area, as well as the text of the game interface and the name of the area. In it, in the script folder, there are the main.scm and script.img files - the first determines the plot of the game, the second contains files with plot details (for more details on * .img format files, see below). It is clear that you will work with the data folder when installing new parameters, terrain maps and story mods.
Folder models (models) - here is the entire San Andreas texture. All mods related to skins, vehicles, weapons, belong to this folder.
Folder movies (films) - here are the initial videos of the game with the logos of the developers and captions.
Folder Readme (read) -there is only one file, called ReadMe, in it the developers thank you for choosing their game and provides information about it.
Folder text (text) - it contains files that define texts in the game, subtitles of videos and comments of peds. In a Russified game, Russian subtitles are defined by the american.gxt file. The truncated pirate versions contain only it (sometimes even spanish.gxt), so switching the language in them is impossible. Entire versions contain subtitles in other languages.
Files eax.dll, ogg.dll, vorbis.dll and vorbisFile.dll- application components (i.e. games) can be replaced when installing any global structural mods during the installation of the latter, we will not work directly with them.
File stream.ini-It contains various data related to the running application of the game. This file is used when you need to optimize the game or change other parameters. It has nothing to do with the installation of mods.
Sixth, text file INSTALL, usually found in the game folder, contains installation information, etc. It is of no interest to us.
Running application gta_sa.exe-There's nothing to talk about, roughly speaking, this is a game.
Running application Uninstall (Unins, UNWISE) -installation program, deletes the game.
A bit about files
A mod is a modification of a game file. Therefore, you need to know the basic properties of these files, so that in the future there will be less problems in working with them.
Elements of the GTA world, such as peds, weapons, vehicles, player skins, houses, roads, etc., are all three-dimensional images, i.e. have a virtual frame (shape) and color. For this reason, each element is divided into two files: a wireframe form file and a coloring file.
Form files are in * .dff format. They can be viewed using the DFF Viewer program. Against the background of the interface, the color of which the user selects in the settings, the weapon (or ped) looks like a cluster of white stripes connecting in one shape.
The color of the element is in * .txd format. You can change the color of an item by editing such a file using the appropriate program. In this case, the shape of the element will remain the same.
Files of the shape and color of the same subject have the same name. Their names correspond to the name of the item itself (for example, the Kalashnikov assault rifle is divided into files- ak47.dff and ak47.txdThe rider is listed as ryder.dff and ryder.txd).
There are a huge number of elements that make up the game space; for several reasons, they are assembled into a single file in the * .img format. This eliminates the possibility of accidental removal or damage to individual elements. img-files can be viewed and edited using appropriate programs, the most popular of which is IMG Tool v.2.0 (there is a Russified version of this program). The items in them are listed as individual files.
Almost all mods related to the skins of characters or objects are associated with only two img files: gta3.img and player.img (in folder models) The first is the largest in size, it contains almost the entire San Andreas home, roads, pedas, cars, weapons. IN player.img there are elements of CJ's appearance. The remaining img files contain details of cut scenes, visual effects, and a plot script.
Weapon animations and shooting mods are also common. Animation scripts for all types of weapons are in the file gta3.img, have the extension * .ifp. For example, rifle.ifp is responsible for the animation of rifle shooting (sniper, hunting and assault).
It is impossible not to mention the files of the parameters of the transport, weapons and characteristics of the peds - they have the * .dat format, are in the folder data. The data in them is presented in the form of tables — on the left is a column with the names of weapons, vehicles or pedas, on the right are columns with numerical parameters.
§ 2. Practice
To install mods, which are modifications of the files of the original game, two programs are required: Notebook (you have it, although better Wordpad) and RUS (implies a Russified version of the program). The following examples provide instructions for installing such mods.
Setting the appearance of characters (peds)
In this case, our task is related to the file gta3.img(in folder models).
For example, you downloaded a zombie model. By default, it replaces the Ryder skin. In this case, the downloaded archive should contain files ryder.dff and ryder.txd. So, to install the zombie model, you need to extract the files with the Ryder and replace them with files with the zombies. Just in case, Ryder's skin needs to be saved in some folder.
1) We extract files from the downloaded archive into My Documents.
2) Using IMG Tool open gta3.img;
3) When the file is downloaded and a list appears, click on the menu Edit the function To find.
4) In the window that appears, write the name of the first file- ryder.dff, click "Find Next", the file is located.
5) On the line ryder.dff right-click (RMB), in the list that appears, click Eject. We indicate the path to the folder in which we save the Ryder skin just in case.
6) Next, click RMB again, click on the list Delete, confirm the deletion.
7) With file ryder.txd do the same as with ryder.dff (see paragraphs 3-6).
8) Now Ryder's old skin has been moved to a safe place, it remains to add a new zombie skin in its place.
On the menu Teams click Add. We indicate the path to the skin of zombies. First add ryder.dffthen ryder.txd. Now that we have added zombie skins, we close the program and everything is done.
Set mod animation shooting
Installing such a mod is the easiest - we do what is indicated in the previous example, but this time we need to replace only one file (for example, the previously mentioned rifle.ifp).
Vehicle Installation
Installing the transport skin is the same as in the example with the installation of the pedal skin — we extract the old files to a safe place, install new ones instead.
However, some modes of transport require parameter changes — changes in weight, wheel size, etc. Here it will be necessary to deal with the folder data, files vehicles.ide, carcols.dat, carmods.dat or handling.cfg, and even with all together.
These files are opened using Notepad, their main and main contents are tables with machine names and corresponding parameters (the developers made it so that it was convenient for the moderators to change the parameters).
In the instructions ( readme), attached to the downloaded mod, lines with new data should be given, it also indicates which line in the game files should be replaced. For example, in handling.cfg there is such a line-
BUFFALO 1500.0 4000.0 2.0 0.0 0.0 -0.1 85 0.7 0.9 0.5 5 200.0 28.0 5.0 R P 11.0 0.45 0
30.0 1.2 0.12 0.0 0.28 -0.24 0.5 0.4 0.25 0.50 35000 2800 10200000 1 1 0
and it must be replaced by
BUFFALO 1000.0 2500.0 2.9 0.0 0.0 -0.1 85 0.7 0.9 0.5 5 250.0 28.0 5.0 R P 11.0 0.45 0
30.0 1.2 0.25 0.9 0.28 -0.70 0.5 0.3 0.25 0.50 35000 2800 10200000 1 1 0
which you do with Notepad.
Even better, if the author directly uploads a modified file so as not to bother an inexperienced user looking for the right line: inexperience can damage the file, so copy the original to a safe place before installing the mod.
Weapon installation
Installing new weapon skins is the same as in the first example. However, as with transport, a change in parameters may be necessary. Weapon parameters are contained in the file weapon.dat (folder data) The weapon parameters in this file are given in the same way as the transport table, convenient for the user.
Following instructions readme, find and replace the specified lines (after copying the original weapon.dat to a safe place). Again, I repeat, for modmakers, it is advisable to include a ready-made modified file in the archive with new weapons (or vehicles) in order to avoid the case of a spoiler of game files by a beginner!
Installing new player skins
Installing player skins (more precisely, appearance elements) is completely identical to the example with the installation of new peds. The only difference is that you will be dealing with player.img, and you have to replace the coloring file - *. txd. That is, open player.img, find the old skin, for example, tshirt.txd, remove it to a safe place, add a new one instead tshirt.txd.
Installation of terrain maps
There are three types of mods that change the map of the area:
1) An element is simply added or removed (e.g. a fence, sentinel tower, or island). In this case, the files in the datamaps folder are replaced.
2) The skin of the building is changed or added (e.g., the Kremlin). In this case, you need to replace or add certain files in gta3.img, as in the example with the skins of pedals (see above).
3) The new skin of the building is changed or added, plus its location is set (for example, the Kremlin is added, which stands on an island far into the sea). Here you need to either replace / add a file in gta3.img, or replace files with a map in the datamaps folder.
It should be noted that the modified map files are set ready, they just need to be replaced with the corresponding ones (this is written in the instructions readmeattached to the downloaded mod).
More about the parameters of weapons / vehicles / peds
Options in the folder data many, but of interest are the parameters of the most important elements-weapons, vehicles, peds and water level.
All files are tables in English, which is not difficult for an experienced mod user to figure out, but for a beginner it's difficult. Therefore, specials have been developed. programs for each kind of parameters, for example, using a program Pedstats viewer you can change the social characteristics of passers-by (cowardice, law-abiding, temperament), as well as physical. properties - impact power, accuracy, ability to defend. Pedstats Viewer adjusts data in a file pedstats.dat (data folder).
Through Weapon Editor by Sadler v. 0.14 You can quite thoroughly edit the weapon. FROM Waterlevel You can change the water level in the ocean and the height of the waves.
Installation of story mods
Installation of story mods comes down to replacing files main.scm and script.img in folder data / scriptfile american.gxt in folder text, and if there is voice acting, adding files to audio. Some mods mean new screensavers when loading a game; replacing them is not very difficult, just follow the instructions readme.
§ 3. CLEO libraries
Mods can be quite diverse, and for some existing mods I would have to make a bunch of small changes in the game, which is irrational. Change the script here, add the file there, here a new function is not for everyone, and it's dreary. Therefore, the so-called CLEO libraries are special global mods that greatly simplify the installation and removal of various mods.
The essence of their functioning is as follows — some files of the game are changed, due to which, roughly speaking, the game begins to interact, "obey" the files in the folder Cleo, a new folder in the root directory of the game. Also, files are added to the root folder of the game bass.dll, CLEO.asi, vorbisHooked.dll and reference CLEO.chm.
Thanks to this library, the script / plot modification can be formatted as a CLEO script and dropped into a folder Cleo. If necessary, the script can be deleted from there. In folder Cleo there are two folders CLEO_SAVES and CLEO_TEXT. The first one stores the saves of any changes made using the script, CLEO-saves are associated with the game saves. The second folder contains files containing texts for the script, for example, the interface of a function or a conversation in a cut scene.
Today the library is the freshest CLEO 4, you can download a special installer, with which even an inexperienced noob can install the library in the game.
CLEO scripts have the extension * .cs. After downloading, you need to drop them into a folder Cleo, and additions (file with text) to the folder CLEO_TEXT. In the game menu in the lower left corner reflects the version of the library, as well as the number of downloaded scripts.
CLEO scripts can introduce various features. From autopilot and the ability to light a cigar while sitting in a car, to opening all the doors of houses that can be cracked and the ability to sail on a submarine. Simple scripts work quite reliably, but some can lead to a game crash.
Here in general terms was presented what every user of mods should know. You can ask various questions about their installation in the comments, the author will try to answer them as they gain knowledge and experience.
| Change the "look of the game" and create a more interesting gaming atmosphere. In the game you can replace: cars, skins, weapons, textures, objects and much more! How to install mods in GTA San Andreas
We proceed to install the mod: In the program, select: File -\u003e Open. In the window that opens, go to the folder with the installed game -\u003e further to the models folder and select the gta3.img file -\u003e click Open. At the bottom left of the program should appear the words Files added. Last step: click File -\u003e Rebuild Archive. In the window that opens, go to the models folder and select Save -\u003e Confirm replacement. |


How to Install Vehicle Mods in Gta San Andreas
Source: https://karaokeonlain.ru/en/gta-sa-kak-stavit-mody-sposoby-razyasnyayushchie-kak-ustanavlivat-mody-na/